
There will come a time in every camera users life, where you will have been out and taken some shots and when it comes to having a better look on your computer or during the edit you will notice dark spots on your images, usually presenting themselves in areas of plain light backgrounds such as the sky or against a white/grey background.
Do not despair your camera isn’t broken and the shots affected can always be saved with the help of Photoshop’s spot healing brush. Going forward this problem can’t be ignored or just edited out. So what are these spots? They are usually just dust/dirt deposits either on your lenses or on the sensor of your camera and can be removed with some cleaning.
IMPORTANT: By undergoing the processes outlined in this guide you do so at your own risk and it is up to you to feel confident in both yourself and your abilities
The First Step | Finding the Dust/Dirt
Check & clean your lenses, make sure you check both the front and rear elements as nearly always it will be on the front, but in some cases, you may have managed to get dust on the rear element when changing.
Now that your lens/lenses are clean it’s time to check again with a test shot to see if a dirty lens was the cause or if in fact, your sensor requires further investigation & cleaning.
Take a test shot to see sensor dust
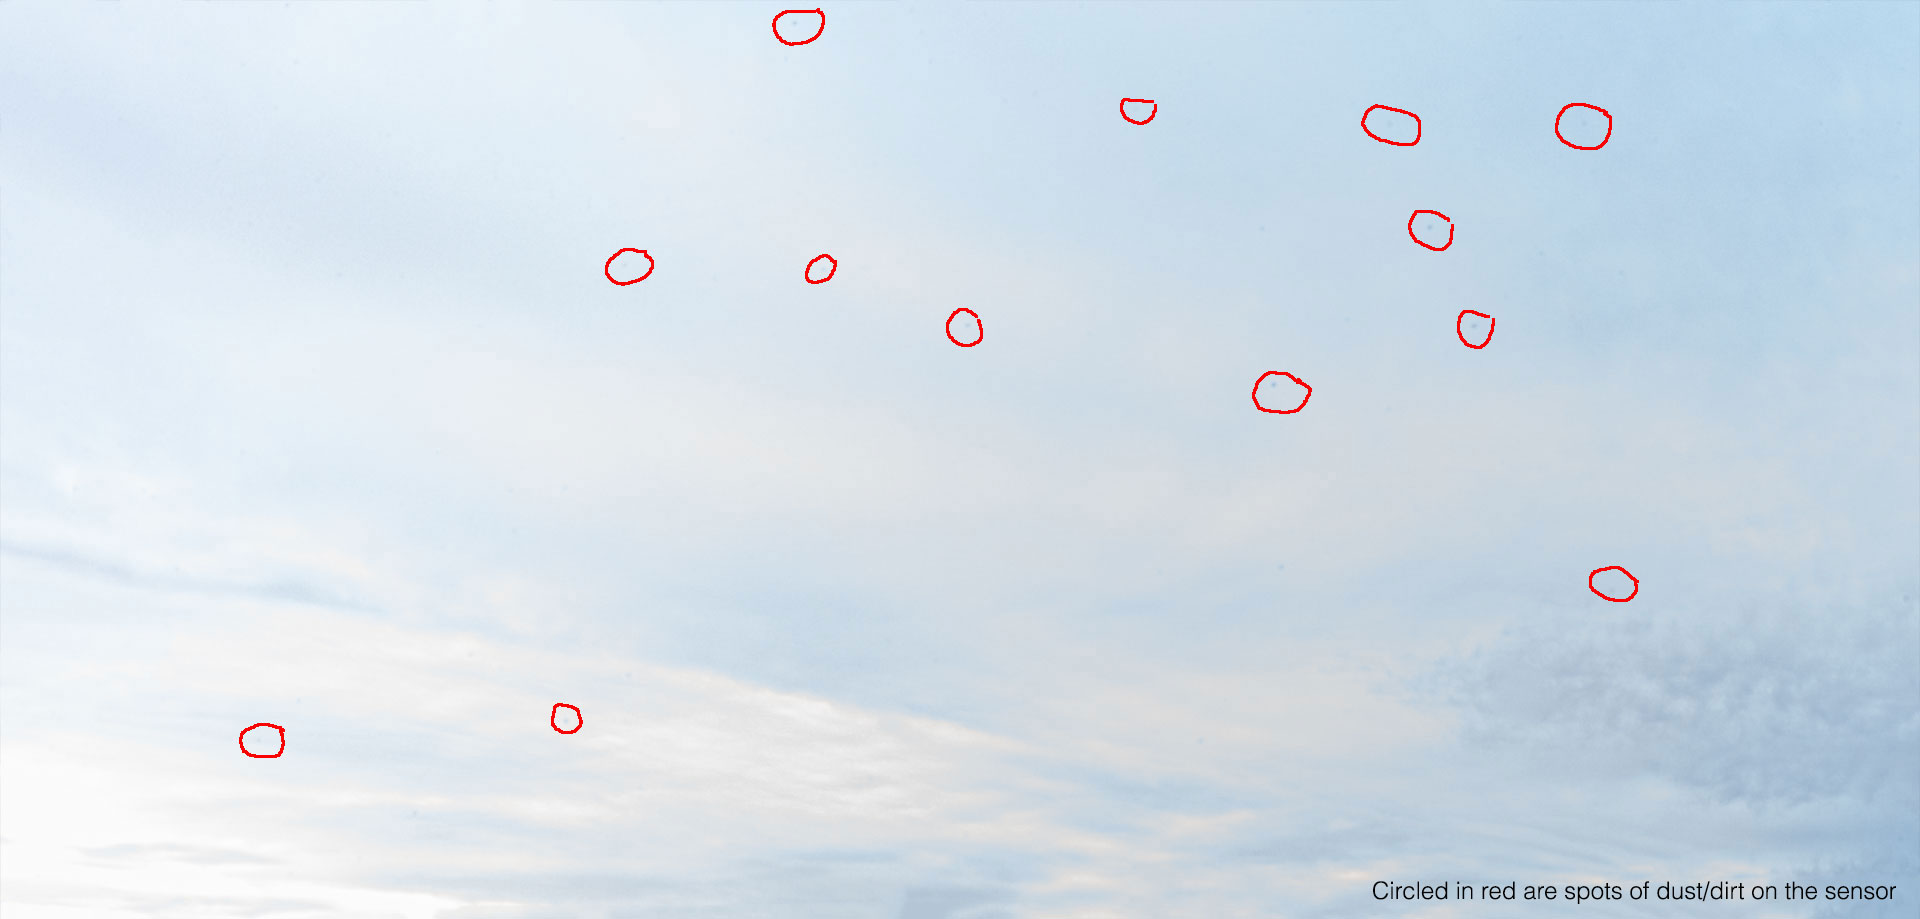
Either take a shot of a clear blue sky or a piece of white paper.
Using Aperture Priority (A or Av) mode, select the smallest aperture (e.g. F16, F22). Turn off autofocus and set your ISO to 100 or 200. Fill your frame with the sky/paper and use the focus ring to unfocus the sky/paper (being out of focus helps to make the dust more visible). Now take a picture.
It is now time to check for dust, to do this you need to load the image into your computer and inspect it at 100% zoom. Some photographers say this can be done by inspecting the back LCD screen at 100% but this is not as easy or as accurate as viewing on your monitor.
If your sensor has dust on, you’ll see little blobs/smudges in your image (See Image Below). You will need to move on to The Second Step of this process, cleaning the sensor of your camera.
When hunting down dust just bear in mind the following
It’s common to see/find dust in your viewfinder, this dust will not show up on your images themselves.
If you shoot/or have been shooting at wide apertures (such as f/2.8) you may not have seen/come across any sensor dust on your images before this is due to the depth of field being wide enough to put these dust/dirt spots out of focus rendering them very difficult to see if you can see them at all.
You can pretty much always tell that it is dust or dirt on your camera's sensor when you see the same spots appearing on multiple images in the same places.
You may see/come across dust on the mirror of your camera, as this is on the mirror and not the sensor this is not the dust/dirt being recorded on your images. This should however be removed using an air blower.
DO NOT use compressed air for internal cleaning of your camera as this is far too powerful and may damage your cameras delicate insides. I find the best method is to remove the lens and turn the camera body over (this prevents dust from settling back in) then blow the body out with the hand/bulb air blower.
The Second Step | Cleaning Your Cameras Sensor
IMPORTANT: Before you start this process ensure your camera battery is fully charged. You do not want your camera to turn off mid-clean and damage the sensor if it runs out of power. By undergoing the processes outlined in this guide you do so at your own risk and it is up to you to feel confident in both yourself and your abilities
Please Note: This content is not endorsed/sponsered by any of the manufacturers/brands described or depicted and the items listed below are what you will require to follow this how to guide. The items listed have been selected from my own experience & are purely there to enable you to have an easy way to find everything you could need and an easy way of purchasing them. Please do however note the links shown are affiliated, to find out what this means please read this disclaimer by Clicking Here.
Items you need:
1. Cleaning packs of sensor swabs & sensor cleaning solution.(Note: Cleaning swabs are designed for your camera’s specific sensor size so make sure you purchase the suitable type)
Full Frame 1.0x sensor? Click Here (Affliated Link)
Crop 1.6x sensor? Click Here (Affliated Link)
2. Hand/bulb air blower. A vital piece of equipment when caring for your camera and its lenses.
3. Sensor loupe – A vital piece of equipment when cleaning your sensor, as it lets you clearly and easily see around the inside of your cameras body & its exposed sensor to inspect for dust and dirt.
4. Additional Sensor Swabs.(Note: Cleaning swabs are designed for your camera’s specific sensor size so make sure you purchase the suitable type)
Full Frame 1.0x sensor? Click Here (Affliated Link)
Crop 1.6x sensor? Click Here (Affliated Link)
How to ‘Dry’ Clean Your Sensor
Find an area that is as free of dust and any air flow (drafts) as possible.
With a full battery and no lens on your camera, look for the menu option to manually clean your camera. Check the manual for your camera if you can’t find this option.
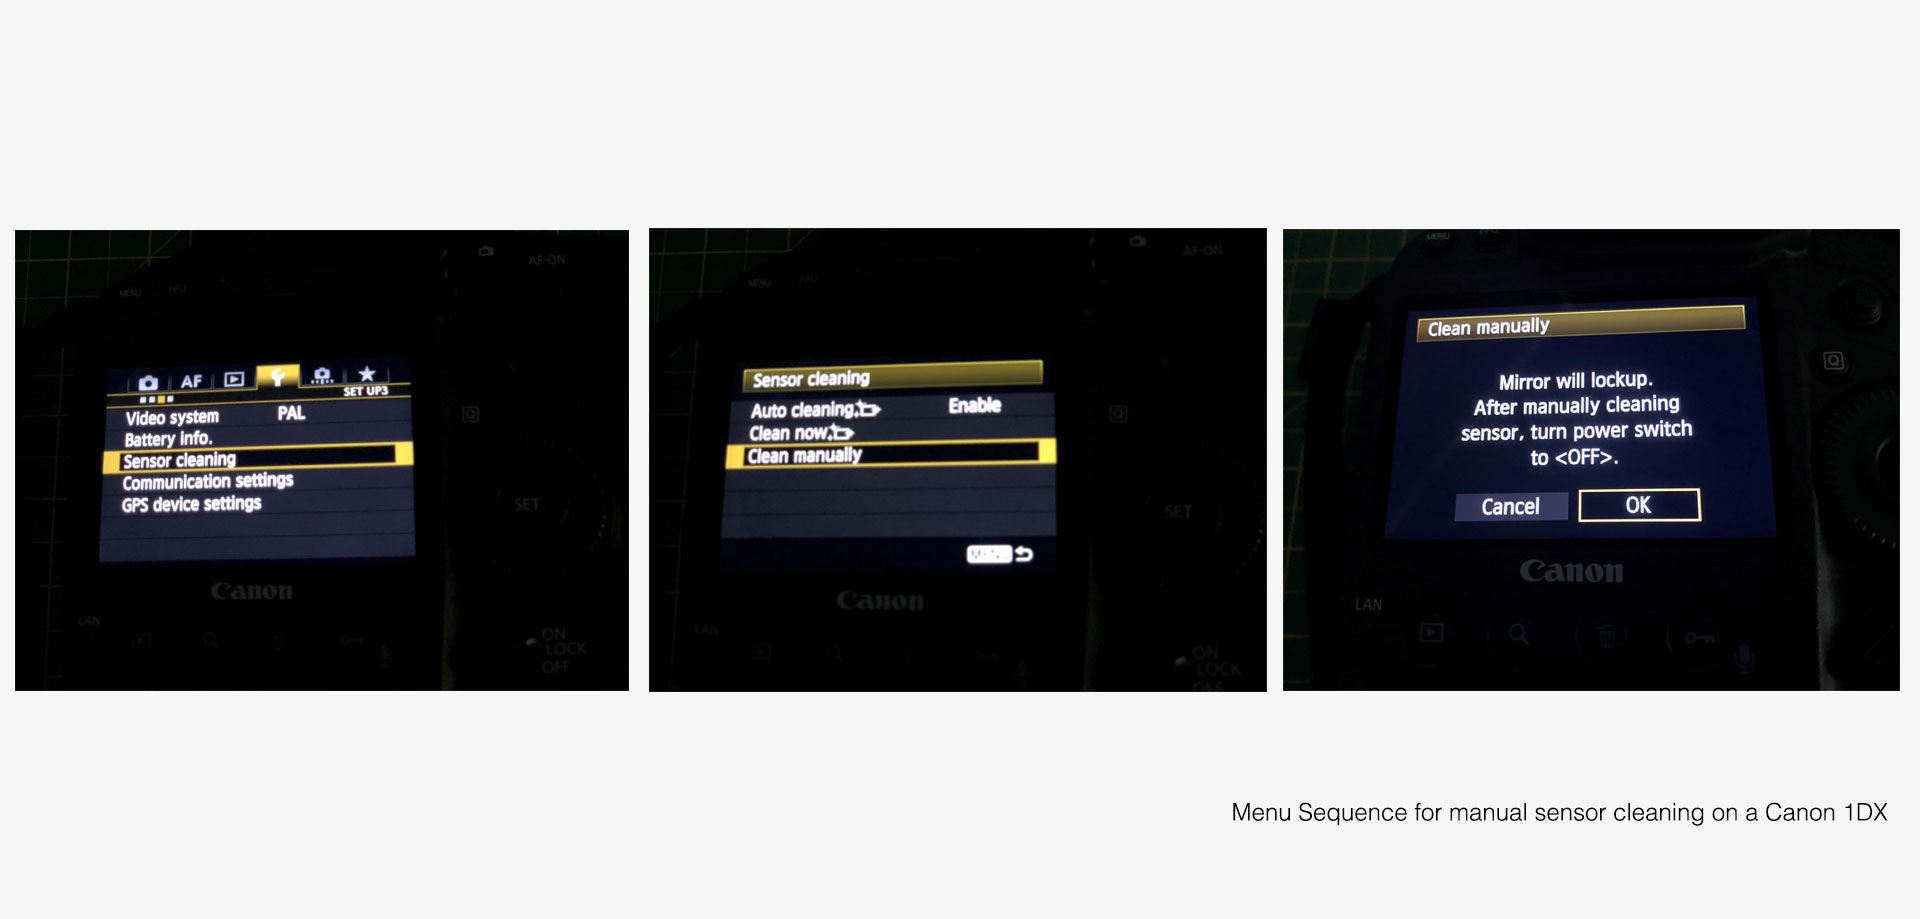
When you select this mode, you will hear the mirror lock back and reveal the sensor. Note that you just need to power off your camera to release the mirror back to its usual place in front of the camera.
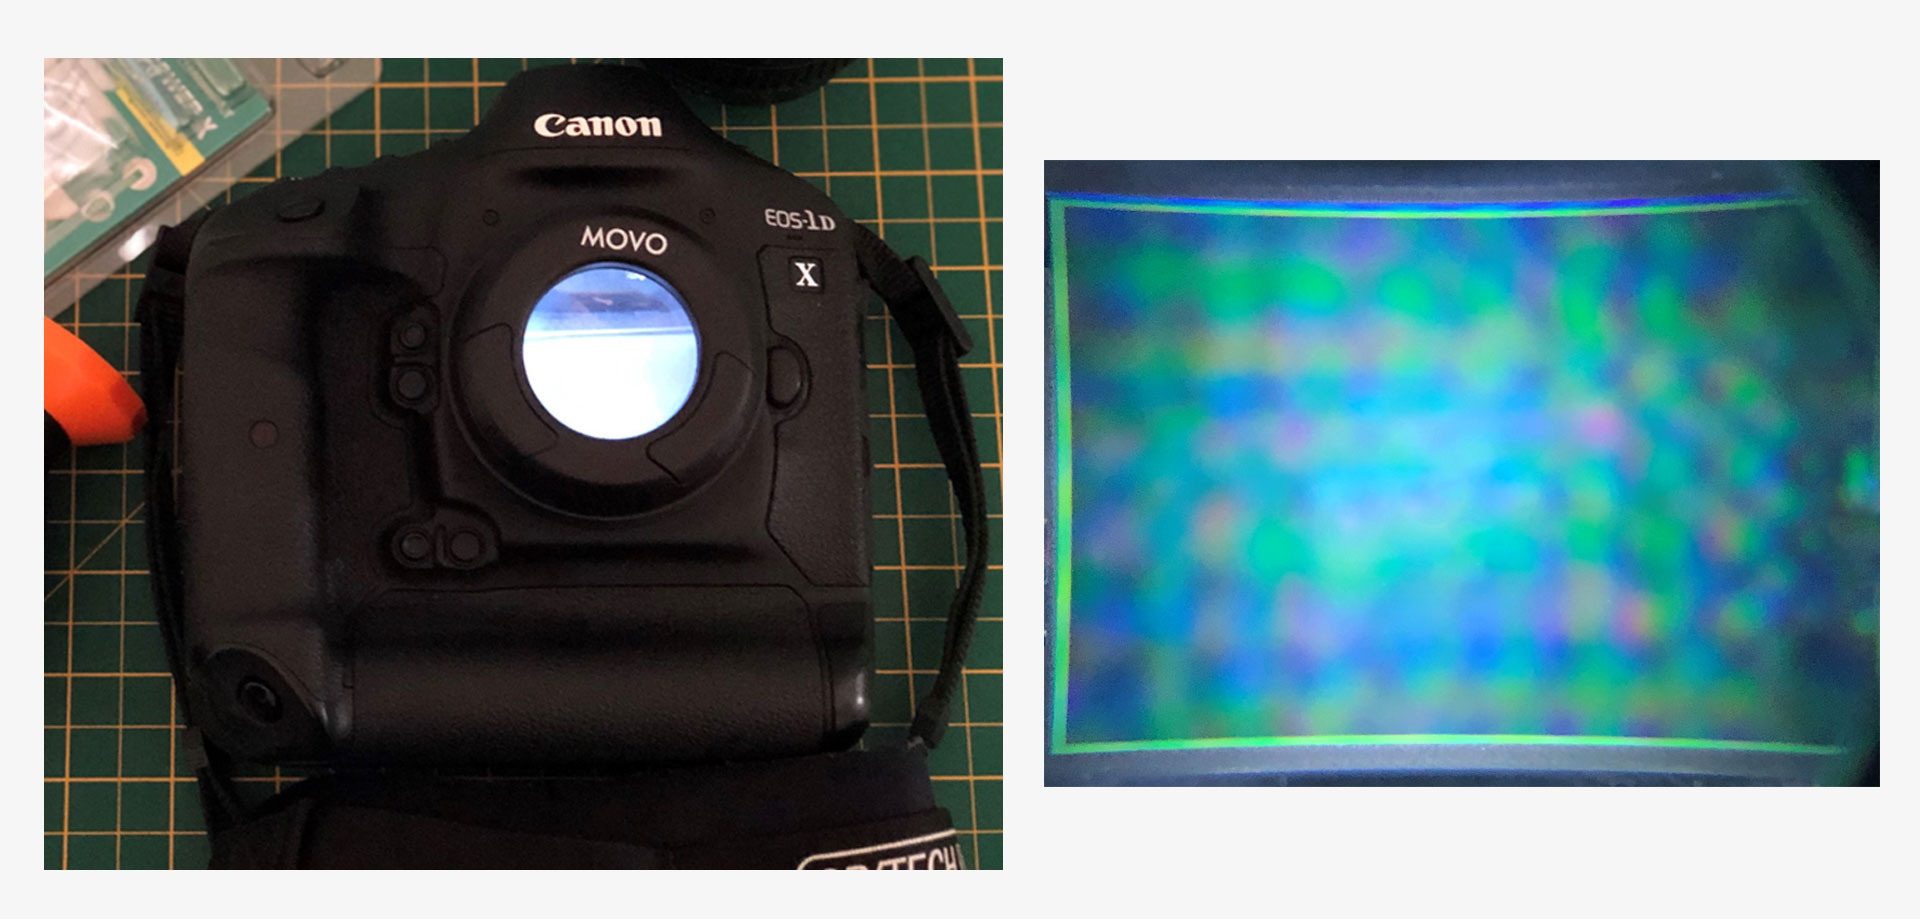
Place the camera down on a clean flat surface with the lens mount/sensor facing towards you, take the sensor loupe and turn it on so the LEDs light up. Place this over the lens mount facing the sensor so that the lights fill the body (It sometimes helps to be in a sligtly darkened room to do this). Using the loupe you can clearly see and inspect the inside of the camera and with its magnification you can clearly see where there is dust/dirt on the exposed sensor.
Holding the camera upside down so the LCD screen is facing the ceiling, use the manual air blower to blow air into the camera onto the sensor. Be extremely careful NOT to touch the sensor with the tip of the blower. The best practice is not to put the tip of the blower inside the camera at all. Again do not use compressed air.

After a few blasts of air turn the camera over and inspect again using the loupe, you should clearly see if any dust you could spot before has gone with the blowing process you just performed.
If you are happy with the results after inspection with the loupe, turn off the camera (You will hear the mirror re engage) and replace the lens. You should take another test shot (as previously walked through above) to see if this has removed the dust or dirt that was on the sensor. If it has then there is no need to take any further steps. If it remains, then you will likely need to proceed to a ‘wet’ clean of the sensor.
How to ‘wet’ clean your sensor
Select the manual cleaning option to lock up the mirror.
Place the camera down on a clean flat surface with the lens mount/sensor facing towards you, take the sensor loupe and turn it on so the LEDs light up. Place this over the lens mount facing the sensor so that the lights fill the body (It sometimes helps to be in a sligtly darkened room to do this). Using the loupe you can clearly see and inspect the inside of the camera and with its magnification you can clearly see where there is dust/dirt on the exposed sensor.

Remove a sensor swab and using the air blower a few times, blow air to remove any odd fibres that may be stuck to the swab. Note: Never use a sensor swab dry they should always be used with a sensor cleaning fluid
Add two (or three drops max) of the Sensor Clean™ cleaning solution to the tip of the swab. Do not oversaturate the swab or you will leave streaks on the sensor. Less is more in this case!
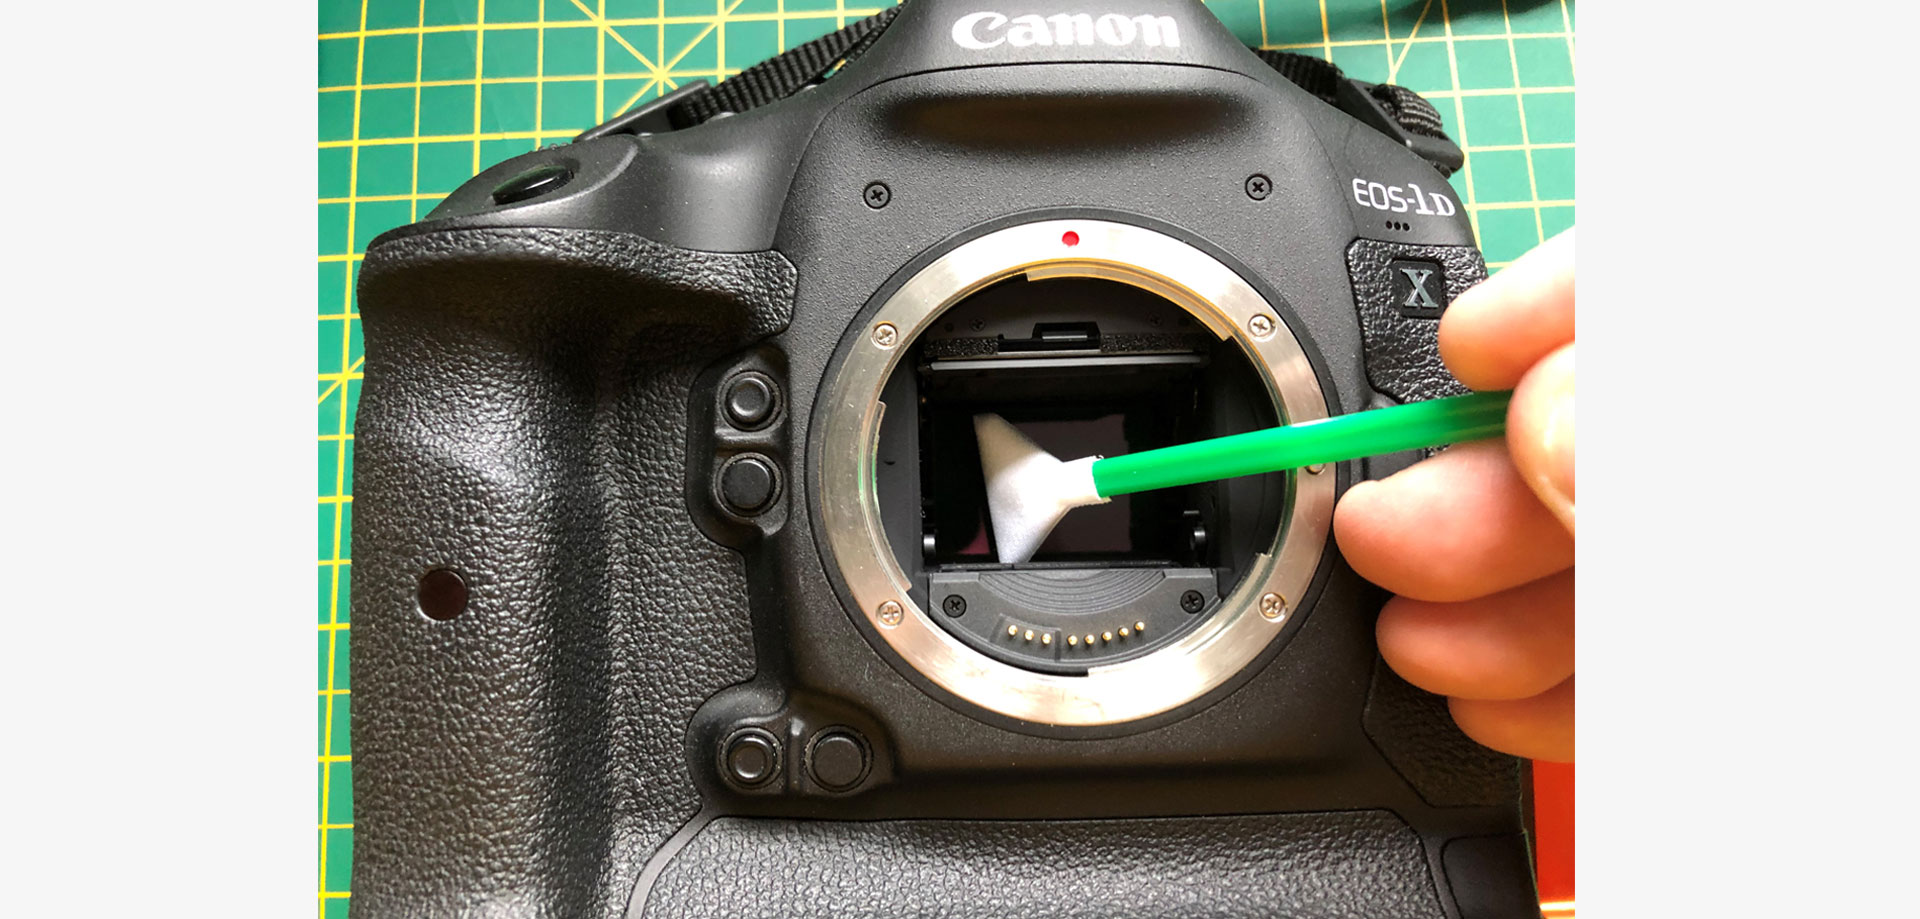
With great care place the swab onto one side of the sensor and with not too much force, gently move the swab across the sensor in one smooth motion. When you get to the other side, turn the swab over and repeat the process starting from the far side back to where you started. Again, do this in one smooth motion with no great force.
At this stage, I use the sensor loupe again and inspect the sensor to see if I can see if the dust has been removed. If you are not sure, turn off the camera and replace the lens and take a further test shot to inspect for dust.
If you see some dust remains then you will need to repeat the process, for more stubborn marks it might be better to repeat the process with Smear Away™ cleaning solution that is designed for this purpose but as with all sensor cleaning it is important to use another clean new swab regardless of the sloution being used. Do not reuse a swab.
Note: If you see streaks on the sensor then this means that you have used too much solution. Wait a few minutes and then repeat the process with less solution. Two drops are usually enough.
You will now have a clean sensor. When done properly with the correct equipment it is quite a simple process to clean the camera’s sensor. Although a little daunting the first time, you will be saving yourself the unnecessary expense and inconvenience of being without your camera by using a "professional" cleaning service.
